

Your plugin needs a place to store player data? Your web stats page needs something more solid than a spreadsheet? A database is usually the missing piece.
In this 2026 guide, you’ll learn how to create a database on MineStrator, pick the right database engine, and manage it safely. We’ll cover both options: the included databases (quick and simple) and the dedicated pod method (more flexible).
Before you start, make sure you have at least a MyBox4 plan, since database features require it.
Supported database types on MineStrator
MineStrator officially supports several database engines, depending on the hosting method you choose. Here are the versions currently available in 2026.
MySQL (5.7 and 8.0)
MariaDB (10.11)
MongoDB (7)
Redis (7)
What a database is used for
A database is a service that stores and retrieves data reliably for your server or website. Instead of keeping everything in flat files, your apps can query data instantly, sync it across servers, and keep it safe between restarts.
In gaming, databases are commonly used for persistent stats, economies, permissions, and cross-server features. They’re also the backbone of most web dashboards and stores connected to your game server.
Minecraft plugins: economy, permissions, inventories, configs, network sync
Other game servers: leaderboards, progression, player statistics
Websites: stats pages, web stores, articles and content
Choose the right database for your server
Picking a database isn’t about “best overall”, it’s about the right tool for your use case. If you’re running a classic Minecraft server with plugins, you’ll usually be fine with MySQL or MariaDB.
MySQL / MariaDB: best for most Minecraft plugins (Essentials, LuckPerms)
MongoDB: great for complex or large datasets (some inventories, large structures)
Redis: perfect for ultra-fast temporary data and inter-server communication
💬 Good to know: For multi-server networks (BungeeCord/Velocity), Redis is often used as a fast “shared brain” for caches and messaging.
Understand the two hosting options
On MineStrator, you can create databases in two different ways. The right choice depends on whether you want simplicity or maximum flexibility.
Included offering: shared databases with externalized resources. Only MySQL and MariaDB are available here.
Dedicated pod: uses your plan’s dedicated resources. This allows MariaDB, MongoDB, and Redis.
⚠️ Warning: If you run heavy workloads (big stats plugins, large websites), avoid piling everything onto a tiny pod without monitoring RAM and CPU usage.
Create MySQL or MariaDB (included offering)
This method creates a database using the MyBox included offering. It’s the fastest setup and the most common choice for plugin-based Minecraft servers.
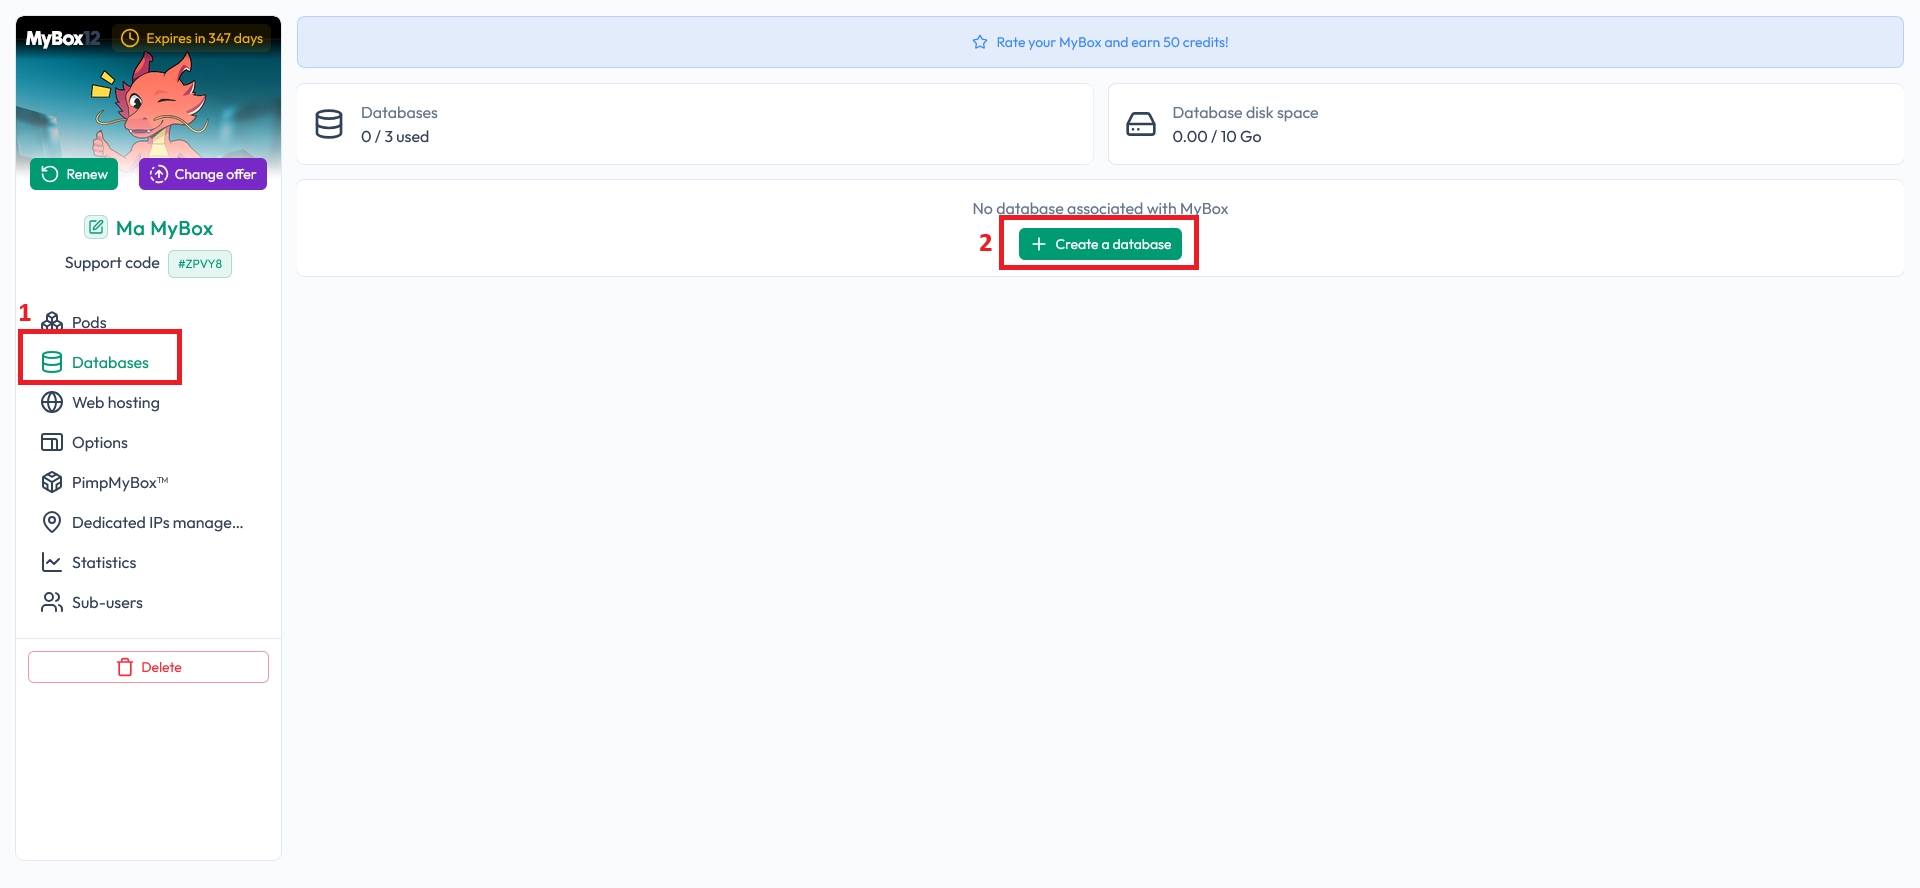
Start by opening the Manage my MyBox page from your MineStrator panel.

Next, open the Databases page and click the + button to create a new database.
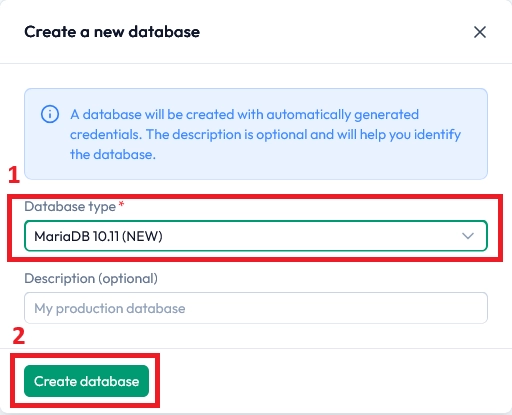
Select your database engine and version (MySQL 5.7, MySQL 8.0, or MariaDB 10.11), then click Create the database.
Your database is now created. To manage it, use the built-in phpMyAdmin access shown under the database information.
Click the phpMyAdmin button, then log in using the credentials displayed in your panel.
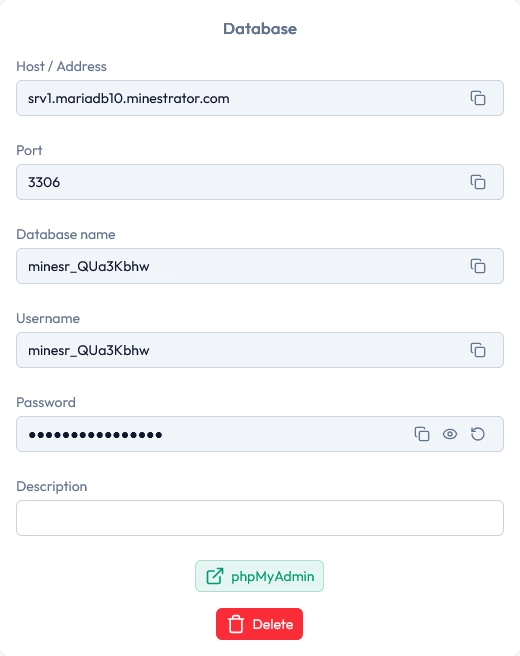
💡 Tip: If a plugin asks for a “host”, use the host value shown in your panel, not your game server IP.
Create MariaDB, MongoDB, or Redis (dedicated pod)
With a dedicated pod, you use your own resources directly. For most database use cases, 1 core and 1 GB RAM is already plenty, unless you run a large network or a busy website.
Create a MongoDB (or Redis) pod
To create a pod, click Add a pod, choose the database type (MongoDB in this example) and the location, then click Add a pod again to confirm.
Once the pod is created and started, you’ll find the credentials in the Server Settings page.
This workflow is the same for a Redis database pod.
Create and configure a MariaDB pod
MariaDB pods require one extra step: you must manually create the database and user, then assign permissions. Unlike the included offering, nothing is created automatically.
Run the following SQL commands from the console to create a database and a user, then grant access. Replace placeholders with your own values.
Add these commands in your MariaDB console:
CREATE DATABASE your_database;

CREATE USER 'your_user'@'%' IDENTIFIED BY 'your_password';

GRANT ALL PRIVILEGES ON your_database.* TO 'your_user'@'%';
FLUSH PRIVILEGES;
If you want to grant global privileges (access to all databases), use this instead:
GRANT ALL PRIVILEGES ON *.* TO 'your_user'@'%' WITH GRANT OPTION;
FLUSH PRIVILEGES;
🚨 Important: Avoid global privileges unless you truly need them. Limiting access per database is safer and easier to maintain.
Once your user and database exist, you can connect to phpMyAdmin at https://pma.mystrator.com/.
Fill in these fields to log in:
Server: your MariaDB pod IP and port (example:
91.197.6.156:30100)User: the user you created
Password: the password you set
Questions you might have
Which option is best for a Minecraft plugin database?
In most cases, the included MySQL/MariaDB option is the easiest and works perfectly for common plugins. Use a dedicated pod if you need MongoDB/Redis, or if you want more control over resources.
Can I create multiple databases and users?
Yes. You can create multiple databases and users, then assign permissions per database. This is useful if you separate your website data from your game server data.
Where do I find my database credentials?
For included databases, credentials are shown directly on the database page in your panel. For dedicated pods, check the Server Settings page once the pod is started.
Conclusion
You now know how to create a database on MineStrator, whether you want a quick MySQL/MariaDB setup or a flexible dedicated pod for MariaDB, MongoDB, or Redis.
If you get stuck or want help choosing the best setup for your server, check the FAQ or contact our team via Support. Don’t have a server yet? Try it free for 12 hours, no credit card required!

 Enjoy 10% off your first month of server with MineStrator using the code ACTU10!