


Scheduled tasks are one of the easiest ways to automate your server from the MineStrator panel. With them, you can run commands at specific times, restart your server automatically, or trigger plugin features without lifting a finger.
In this guide, you’ll learn how to create a scheduled task, configure its timing, and add actions like console commands or power controls. By the end, you’ll be able to set up your own automation to keep your server clean, stable, and player-friendly.
Accessing scheduled tasks in the panel
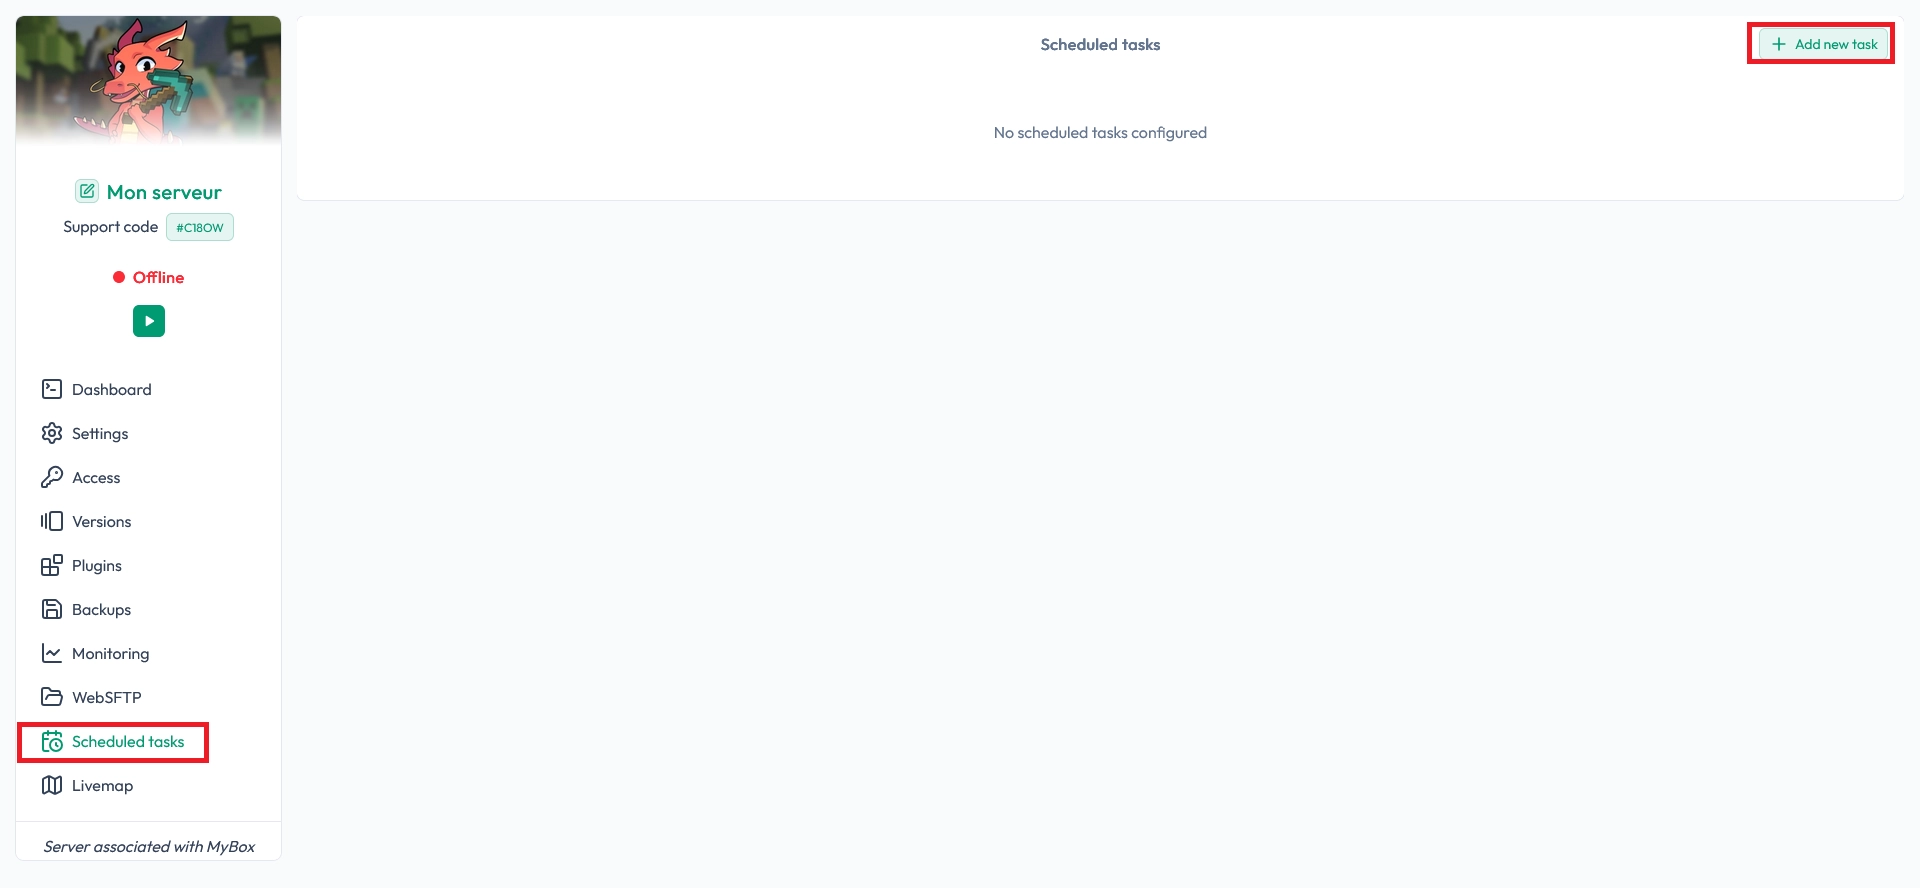
To start, open your MineStrator panel and go to the Scheduled Tasks tab. This is where you can create, edit, or delete any automated task for your server.
Click on Add a new task to create your first schedule:
A configuration window will open where you can define the basic settings of your task:
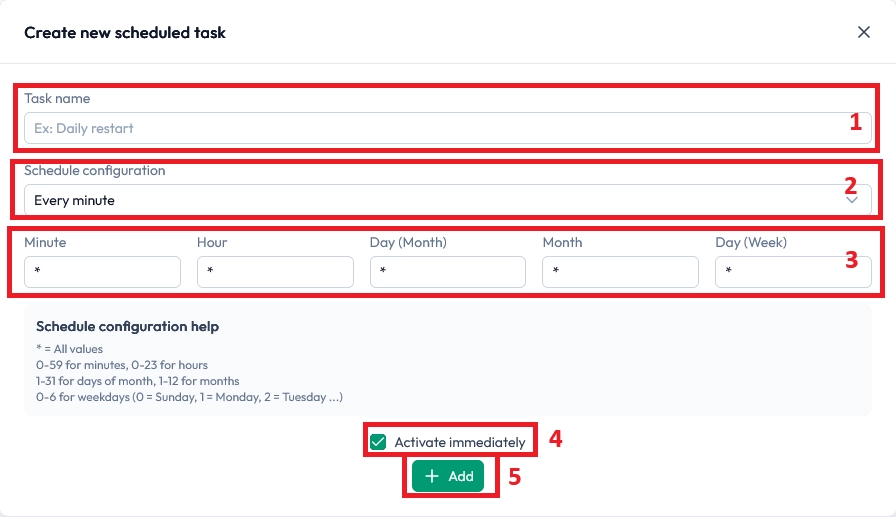
Give your task a clear name so you can recognise it later (for example: “Daily restart” or “Clear entities”).
Select a preset that matches when you want the task to run. If none of them fit, you can configure it manually in the next step.
Define a custom schedule if needed. If the preset already suits your needs, you can skip this and move on.
Uncheck the box if you don’t want the task to run as soon as its conditions are met. This is useful for tasks that run very often, like every minute, especially if you plan to add several actions later.
Click Add task once everything is configured.
Understanding the schedule format
The schedule fields work similarly to a classic cron system. You can read them from left to right: minute, hour, day of month, month, and day of week. The * symbol means “all possible values” for that field.
For example, if you put * in the Minute field, the task will run every minute. If you put * in the Hour field, it will run every minute of every hour. If you enter 5 in the hour field, the task will run every minute during the 5th hour (in 24h format, so at 5 AM).
You can also use ranges and steps. For instance, */5 in the hour field means “every hour divisible by 5” (0, 5, 10, 15, 20). These patterns work the same way for each field, letting you build very precise schedules.
💡 Tip: If you are unsure about a schedule, start with a simple preset, test it, then refine it with manual values.
Creating a new task action
Once your scheduled task is created, you will see it listed in the panel. The next step is to tell it what to do. Click on Add an action to define the behaviour of your task.

A new dialog box will appear where you can configure the action details:
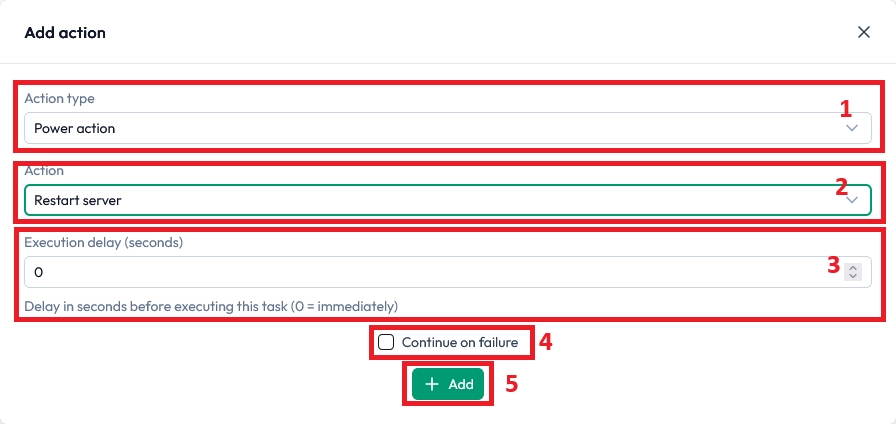
Choose the action type: either send a command to the server console or a power action such as start, stop, restart, or force stop.
Enter the console command to execute or select the power action to perform. In the example above, the action is set to restart the server.
Set a delay before the action is executed. This is very useful when chaining multiple actions. For example, you might send a warning message with the
saycommand 30 seconds before restarting the server.Enable Continue on failure if you want the next actions to run even if this one fails. This is handy for safety sequences like “Stop server → Force stop → Start server”.
Click Add action to save it to your scheduled task.
🚨 Important: When chaining power actions, always leave a short delay between them to avoid conflicts and give the server time to shut down or start properly.
Example: safe restart sequence
To better understand how actions work together, here is a typical restart sequence you can automate with a scheduled task. This keeps your server stable and gives players time to react before a reboot.
Action 1: Send a console command like
say Server restarting in 30 seconds!with a delay of 0 seconds.Action 2: Add a Stop server power action with a delay of 30 seconds and enable Continue on failure.
Action 3: Add a Force stop power action with a delay of 30 seconds and Continue on failure, in case the normal stop did not work.
Action 4: Finally, add a Start server power action with a delay of 10 seconds to bring your server back online.
💬 Good to know: This kind of automated restart can help prevent lag and memory issues on long-running Minecraft servers.
Frequently asked questions
Can I create multiple actions in a single scheduled task?
Yes, you can add as many actions as you need to the same task. They will run in the order you define, with the delays you configure. This is perfect for complex sequences like announcements, backups, and restarts.
What happens if my server is offline when the task should run?
Power actions like Start server will only work if the panel can reach your instance. If the server is offline for another reason (for example, maintenance), the action may fail, but you can use Continue on failure to keep the rest of the sequence running.
Can I disable a scheduled task without deleting it?
Yes, you can simply uncheck the option that makes the task active. This way, the configuration stays saved in the panel and you can reactivate it later without recreating everything.
Conclusion
You now know how to create a scheduled task, configure its timing, and add powerful actions from your MineStrator panel. With a few well‑designed schedules, you can automate restarts, cleanups, and announcements to keep your Minecraft server smooth and enjoyable.
Want to test your automation on a new server? Try a free Minecraft server for 12 hours, no credit card required, and start experimenting with scheduled tasks right away.

 Enjoy 10% off your first month of server with MineStrator using the code ACTU10!