


Manually install a Minecraft server modpack
Your favourite modpack is not available as a one‑click install on the MineStrator panel? No worries, you can still install it manually on your Minecraft server. This guide walks you through the full process with concrete examples like Prominence II [RPG] and DawnCraft.
You will see how to download the modpack, prepare the server files, handle Forge, NeoForge or Fabric, and then correctly configure your Minecraft server startup. By the end, you will be able to install almost any Minecraft modpack on your MineStrator hosting.
💬 Good to know: If your modpack is on CurseForge, it is often easier to use automatic installation from the panel. Follow the dedicated guide: automatically install a CurseForge modpack.
In this tutorial, we focus on the manual installation of a Minecraft server modpack directly through your server files, whether you have an official server pack or only the client version.
Step 1: Download the Minecraft server modpack
Start by downloading the Minecraft modpack you want to install. You should strongly prefer CurseForge to get your modpacks: it is the reference platform, with up‑to‑date and reliable versions.
Before downloading, check whether the modpack offers a server version (often called server pack or server files). If it does, download this server archive instead of the client version. It will make the rest of the setup much easier.
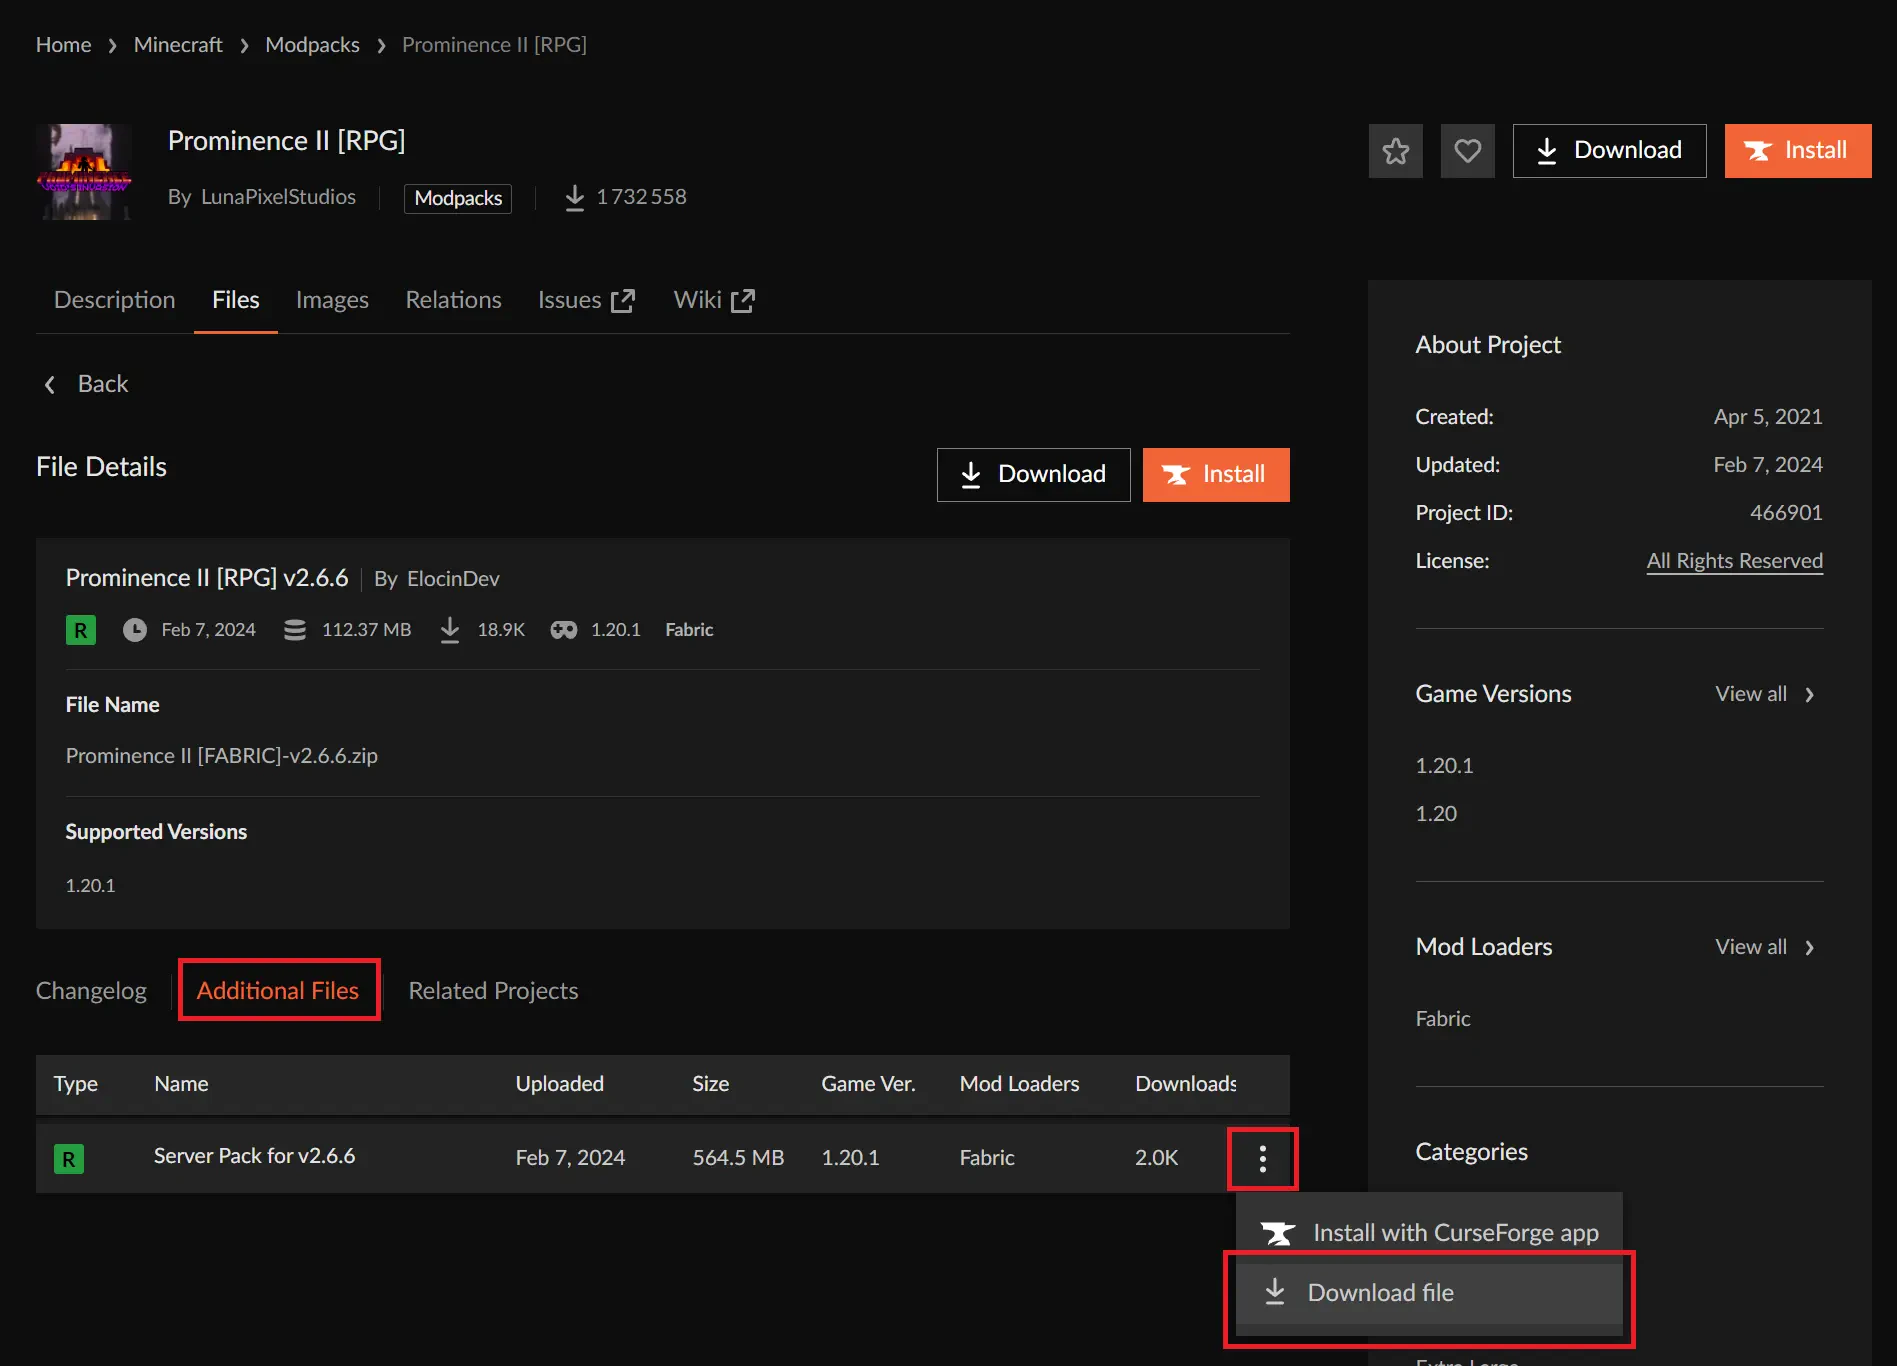
Once you have downloaded the modpack archive, extract it with a tool like WinRAR or 7‑Zip into a folder of your choice on your computer. Inside, you will find the files that will become the base of your modded Minecraft server.
Step 2: Prepare the modpack server files
Depending on the Minecraft modpack you picked, the file structure and the presence of an installer can vary. Your goal is always the same: get a complete set of server files, ready to upload to your MineStrator hosting.
2.1 Run the install script if available
Many server modpacks include an installation script that downloads Forge, NeoForge or Fabric and all required libraries. This script is usually a .bat file (Windows), a .sh file (Linux) or sometimes a .ps1 PowerShell script.
🚨 Important: Make sure Java is installed on your computer before running the installer. Without Java, most of these scripts will not work.
For example, in modpacks like AllTheMods 9, you will find a file such as startserver.bat. The name can change (often with install or start in it), but the idea is the same: run this script so it can download and configure the server dependencies.
Here is the minimum you should have once the files are prepared, depending on the type of modpack:
For Forge modpacks in 1.17 and newer:
A libraries folder containing Forge files
A mods folder with all the mods
A config folder (often present, but not always required)
For Fabric modpacks and Forge modpacks in 1.16 and older:
The vanilla server .jar (for example
minecraft_server.1.12.2.jar)The Forge .jar (for example
forge-1.12.2-14.23.5.2838-universal.jar)A libraries folder for Forge
A mods folder with all the mods
A config folder for mod configurations
2.2 Fabric example: Prominence II [RPG]
For the modpack Prominence II [RPG], the server archive includes a start.ps1 file. This PowerShell script downloads and installs Fabric for the server.
On your Windows PC, right‑click start.ps1 and select Run with PowerShell. Follow the instructions shown in the window. At the end, you should see new files, including a fabric-server-launcher.jar that will be used as the startup file for your Minecraft server.
⚠️ Warning: If PowerShell scripts are blocked, open PowerShell as Administrator and run
Set-ExecutionPolicy Unrestricted, then confirm with the letter O. You can then runstart.ps1again.
2.3 Forge 1.19.2 example: DawnCraft
For the DawnCraft modpack (Forge 1.19.2), things work a bit differently. There is no Forge startup .jar at the root anymore; everything goes through the libraries folder and specific startup arguments.
In this case, the modpack does not provide a Forge installer. You therefore need to download and install Forge manually inside the modpack folder. Go to the official website: Forge for Minecraft.
Proceed as follows:
Launch the modpack in singleplayer on your PC.
On Minecraft’s main menu, note the exact Forge version displayed at the bottom left.
Download the matching Forge installer from the official site.
Run the installer with Java and choose Install server, targeting the modpack folder.
Forge will then create the libraries folder next to the mods and config folders. Once this step is complete, you have a full set of server files ready to upload to your MineStrator server.
Step 3: Upload the modpack to your MineStrator server
Once your Minecraft modpack server files are ready (dependencies included), it is time to upload them to your hosting. To do this, you will use the SFTP access provided with your MineStrator server.
Connect to your server via SFTP using a client like FileZilla or WinSCP. If you are not sure how to do this, follow our detailed tutorial on managing your server with WinSCP and FileZilla.
💡 Tip: Always create a backup of your current server before deleting anything, in case you want to roll back later.
Once connected:
Delete all existing files at the root of your server (except any backup you kept).
Upload all files and folders from your prepared modpack (mods, config, libraries, jars, etc.).
This clean reset avoids conflicts between old files and your new Minecraft modpack.
Step 4: Configure the Minecraft server startup
Your modpack is now on the server, but it will not start correctly until you configure the startup parameters. The method depends on the type of modpack you are using (recent Forge/NeoForge, legacy Forge or Fabric).
4.1 Forge / NeoForge 1.17+: use unix_args
Since Minecraft 1.17, Forge (and NeoForge) no longer use a simple root .jar to start the server. The launch goes through the libraries folder and a specific argument line stored in a unix_args.txt file.
To get these arguments:
Forge: go to
libraries/net/minecraftforge/forge, then into the folder matching your Forge version. Open the unix_args.txt file.NeoForge: go to
libraries/net/neoforged/forge, then into the version folder, and open unix_args.txt as well.
Copy the entire content of this file. On your MineStrator panel, open the Settings tab of your server and scroll to the startup arguments section. Remove the existing arguments and paste the ones from unix_args.txt, then save.
📝 Note: MineStrator already provides all Forge and NeoForge versions as automatic installs. From the Versions tab, you can directly install the version used by your modpack: this automatically applies the correct startup arguments without touching the rest of your modpack files. Just perform a version change as explained in the guide Change Minecraft server version.
If you do not know the exact Forge or NeoForge version, launch the modpack in singleplayer on your PC: the version is displayed at the bottom left of the main menu.
4.2 Fabric and Forge 1.16 and older: pick the right .jar
For modpacks using Fabric or Forge 1.16.5 and below, the server usually starts from a specific .jar file (for example fabric-server-launcher.jar or a Forge jar).
On your MineStrator panel:
Go to the Settings tab.
In the Change startup parameter section, select the modpack’s startup .jar file.
The file name depends on the modpack: it can be a Forge jar, a renamed server.jar or a Fabric launcher. Some modpacks do not provide a startup file at all; in that case, install Forge or Fabric in the correct version first, then adjust the startup file.
🚨 Important: Make sure you use the right Java version on your server: Java 21 for modpacks in 1.21+, Java 17 for versions 1.17 to 1.20.x, Java 8 for versions 1.16.5 and below.
Before the first launch, remember to accept the EULA: open the eula.txt file at the root of the server and replace false with true. Otherwise, the Minecraft server will shut down immediately.
Install a modpack without a dedicated server pack
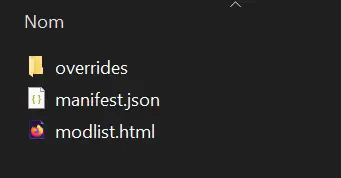
Some CurseForge modpacks do not offer “server files” and only provide an archive containing an overrides folder, a manifest.json file and a modlist.html file. This means the archive is meant for installation through the CurseForge launcher on the client, not directly on a server.
In this situation, you need to manually prepare the server files from the client version of the modpack, then upload them to your hosting.
5.1 Install the modpack on your client
First, install the modpack on your PC through the CurseForge launcher:
Download and install the modpack from CurseForge.
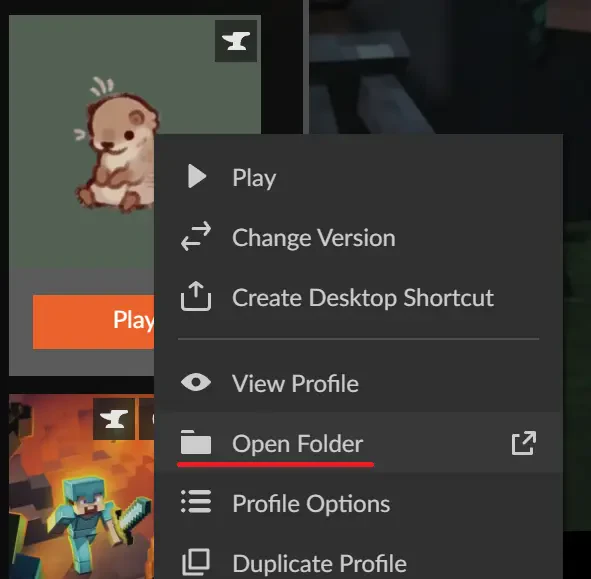
In CurseForge, right‑click the modpack profile and choose Open Folder.
The folder that opens contains the mods, config and other files required for the Minecraft modpack to run on the client side.
5.2 Prepare the Forge server base
Next, you will prepare a Forge server in the same version as the one used by the modpack:
On your MineStrator panel, open the Versions tab.
Install Forge in the version matching the modpack.
💡 Tip: If you do not know the Forge version used, launch the modpack in singleplayer and check the version displayed at the bottom left of the main menu.
Once Forge is installed via the panel, you have a working server base. You just need to add the modpack’s mods and configurations to it.
5.3 Copy mods and configs to the server
From the folder opened with Open Folder on the client side, copy the following items to your server via SFTP (FileZilla, WinSCP, etc.):
The mods folder (all modpack mods)
The config folder (all mod configurations)
Replace or merge these folders with the ones already present on the Forge server installed via the panel, depending on the existing structure.
5.4 Sort out client‑only mods
Because you used the “client” version of the modpack, some mods may be client‑only (graphics, HUD, sounds, etc.) and must not be loaded on a dedicated server. Typical examples are Iris, Sodium, Oculus and other rendering or optimisation mods.
To spot them, start your Minecraft server and watch the console. If an incompatible mod is detected, you will see errors saying a mod cannot load on a dedicated server, often with the message:

The invalid dist DEDICATED_SERVER error means the mod is client‑only. These mods usually change visuals, menus, skins or sounds and must not be on the server. To fix the issue, simply delete the offending mods from the server’s mods folder.
5.5 Final checks and server test
Once the files are uploaded and client‑only mods removed, restart your server. Watch the startup logs: warnings are common with large modpacks, but as long as the server reaches the “done” message without extra crash‑reports, you are fine.
📝 Note: Big Minecraft modpacks often generate many warnings. Do not panic as long as the server starts and stays online.
When the server is running, connect from your Minecraft client using the exact same modpack that you installed on the server side. If you can join and play without crashes, your Minecraft server modpack installation is successful.
Frequently asked questions
How do I know if a modpack is compatible with a Minecraft server?
A server‑compatible modpack usually provides “server files” or a “server pack” on CurseForge. If not, you can often adapt it by installing Forge or Fabric in the same version, then copying the mods and config folders from the client version and removing client‑only mods.
What should I do if my Minecraft server crashes on startup with a modpack?
Check the logs and crash‑reports generated at the server root. Look for errors related to incompatible mods (invalid dist DEDICATED_SERVER) or an incorrect Forge/Fabric or Java version. Fix the issues mentioned (remove mods, change Java version, update Forge) and restart.
Can I mix several modpacks on the same server?
This is strongly discouraged. Modpacks are built with a specific set of mods and configs. Mixing several Minecraft modpacks can cause conflicts, crashes and performance issues. It is safer to start from one modpack and add a few extra compatible mods.
My modpack uses Fabric, is the server setup different?
For Fabric, you need a Fabric server launcher (for example fabric-server-launcher.jar) and the mods and config folders. The logic is similar to Forge: install Fabric in the correct version, upload the mods, set the right startup file and use the proper Java version.
Conclusion
Manually installing a Minecraft server modpack can look scary at first, but by following these steps (file preparation, SFTP upload, startup configuration, client‑only mod cleanup), you can run almost any modpack on your MineStrator server.
If you get stuck at any step or your server refuses to start, feel free to join the MineStrator Discord or contact our support team. And if you do not have a server yet, check out our MyBox plans optimised for Minecraft modpacks and start your modded adventure in just a few minutes.

 Enjoy 10% off your first month of server with MineStrator using the code ACTU10!